
Stripe - Canada Tap To Pay
As of ECP iOS SDK v2.5.0, iOS Tap To Pay transactions are now supported for Canada configured merchants.
This page will provide some additional tips for Canada configured merchants to help with integration. As you set up your integration, please reference the standard ECP iOS SDK documentation pages as well. See the starting page for the ECP iOS SDK documentation here: ECP - iOS SDK
Language and Locale ConsiderationsConsumers integrating to the ECP iOS SDK are responsible for following all required language regulations in their applications.
The Stripe M2 reader is not supported in Canada. For the ECP iOS SDK, Canada merchants must use Tap To Pay on iPhone to accept payments. See the Tap To Pay guide for setup instructions. Additionally, this page will call out considerations and tips specific to Canada merchants.
Integration Tips for Canada Configured Merchants
1. Complete Standard SDK and Tap To Pay Setup
Follow the standard ECP - iOS SDK setup and Tap To Pay setup, referencing the following documentation pages: ECP - iOS SDK, ECP - iOS Framework, Stripe - Tap To Pay. For Tap To Pay specifically, some important general setup steps to ensure to follow include proper Apple entitlements setup, following best practices for App Design, configuring SDK to Tap To Pay, and more. Tap To Pay specific steps are outlined in Stripe - Tap To Pay and additional tips for Canada specific merchants will continue below.
2. Initialize the SDK
Once your app has installed the EverCommerce Payments SDK and the entitlements are properly setup, your app must initialize the SDK.
3. Configure Reader Types (Required for Canada)
To use Tap To Pay, your app must call the method configureReaderTypes in the SharedECPSdk and pass in ECPSdkReaderConfigConstants.TapToPay in the NSSet configuredReaderTypes. Once this is configured, your app can proceed to discover and connect to a compatible Tap To Pay device. Without the call to configureReaderTypes, the SDK will default to bluetooth-only discovery. At this time, bluetooth readers are not supported in Canada. Calling configureReaderTypes is standard procedure for any consumer integrating to Tap To Pay.
Example implementation (after initialize SDK):
 NSSet *configuredSet = [NSSet setWithObjects: ECPSdkReaderConfigConstants.TapToPay, nil];

[self.sharedECPSdk configureReaderTypes:configuredSet completionHandler:^(BOOL isReaderTypesConfigured, NSSet *configuredReaderTypes, NSError *error) {
                if(isReaderTypesConfigured) {
                    NSLog(@"reader type configured success");

                } else {
                    NSLog(@"configure readers error");
                    NSString *errorMessage = [NSString stringWithFormat:@"failure to configure readers error - %@", error.localizedFailureReason];
                }
            }];
4. Display Name (optional)
By default, the property displayName is set to nil. If displayName is set to nil or an empty string this will result in the Tap To Pay payment screen displaying the business name associated with the Stripe location. Consumers can assign a value to displayName. If this value is set to anything other than nil or an empty string, then the value assigned to displayName will show on the payment screen. NOTE: This must be called prior to calling connect device. Once connected, the display name will be set. To change the display name after connecting, your app must disconnect, set the display name to the desired value, and then reconnect to the Tap To Pay device. Display name documentation is also available in the Stripe - Tap To Pay page: Display Name
@property (strong, atomic) NSString *displayName;Example Implementation:
NSString *name = @"Farmer's Market";
[self.sharedECPSdk setDisplayName:name];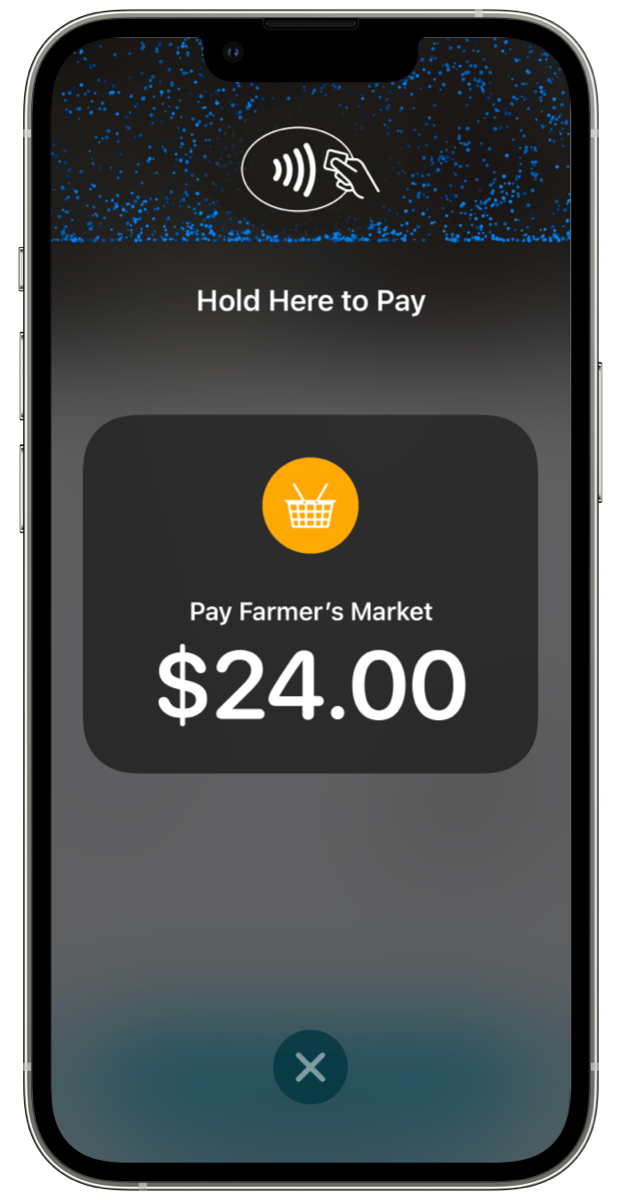
displayName set to "Farmer's Market"
5. Discover and Connect to a Tap To Pay Device
After the SDK has been configured for Tap To Pay, your app can call discover devices. Next, if a Tap To Pay Device is found, your app can call connect device to attempt to connect to that device. A Tap To Pay ECPDevice returned from a call to discover devices will always have id_number = "iOS Tap To Pay". Note: When connecting to a device there may be additional steps such as accepting Apple's Terms and Conditions and configuration updates. Please refer to Stripe - Tap To Pay for more information.
6. Set Currency and Make Sale
When creating ECPPaymentParameters for a Canada transaction, consumers will need to set the currency property to "cad" before calling makeSale. For a Canada transaction, a consumer must explicitly set the currency property to "cad". Otherwise, nil or empty defaults to "usd". "cad" must be used for Canada configured merchants.
Example implementation, specifying "cad" on ECPPaymentParameters and calling makeSale:
ECPPaymentParameters* params = [[ECPPaymentParameters alloc]initWithAmount:amount];
    [params setPaymentDescription:@"test stmt descript"];
    [params setPaymentDescriptionSuffix:@"test suffix"];

    NSString *externalId = self.ExternalIdTextBox.text;
	  [params setExternalId:externalId];
    [params setCurrency:@"cad"];

    [self.sharedECPSDK makeSale:params completionHandler:^(ECPSaleResponse *saleResponse, NSError *error) {
      if ([saleResponse.outcome.result isEqual: @"success"]){
            dispatch_async(dispatch_get_main_queue(), ^{
                [self.NotificationsLabel setText:@"payment succeeded"];
                NSLog(@"success");
            });
        }
        else{
            dispatch_async(dispatch_get_main_queue(), ^{
                [self.NotificationsLabel setText:@"payment declined/failed"];
                NSLog(@"payment failed: %@", error);
            });
        }
    }];
Updated 3 months ago